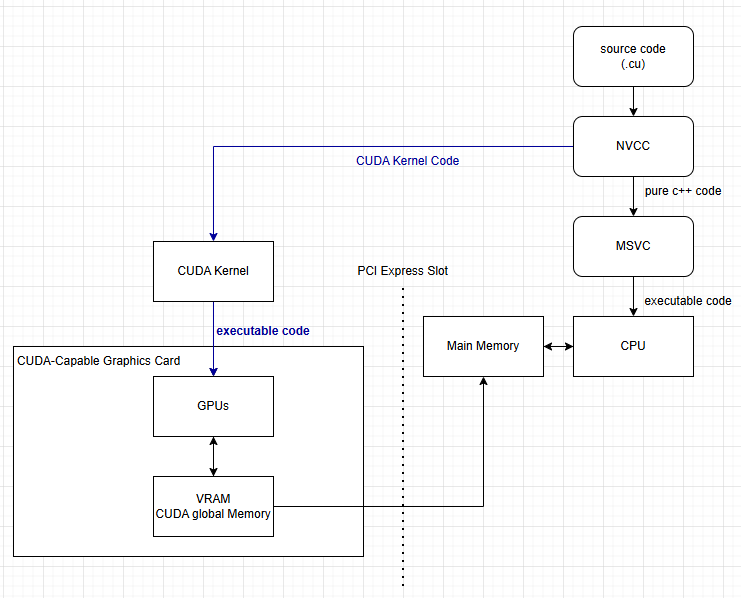
위의 그림을 보자면, Source Code 에서 nvcc (nvidia) CUDA Compiler 가 CUDA 관련된 코드만 쏙 빼가서, 그부분만 컴파일을 하게 된다. Compile 을 한 이후에, executable code 만 GPU 에게 넘겨준다. 즉 전에 Post 에서 사용했던 __global__ 코드만 nvcc 가 가로채서 GPU 에서 실행을 했다고 생각을 하면된다. 그리고 남은거는, MSVC 또는 GNU 가 pure C++ Code 만 가져가서, CPU 에 실행한다고 볼수 있다.
여기에서 용어를 한번 정리를 한다면 …
CUDA Kernel: GPU 가 실행하는 작은(병렬) 프로그램
VRAM: CUDA 가 사용하는 메모리
직접적인 I/O 는 오로지 South PCI Slot 이므로 North PCI 에서는 안됨, 그래서 간접적으로 해야한다. 즉 이 말은 I/O 에서 받아오는것들을 Main Memory 로 들고 온이후에, CUDA Memory (VRAM) 으로 Copy 를 해주면 된다. 그래서 이것저것 GPU 에서 한 이후에, Main Memory 로 다시 넘겨주면 되는 형식이다. 즉 다시 정리를 하자면
외부 데이터로부터 메인메모리, 메인메모리부터 비디오 메모리 (Host CPU)
CUDA Kernel 실행, 비디오 메모리 데이터 사용, GPU 로 병렬처리, 처리 결과는 비디오 메모리 (Device=Kernel Program)
비디오 메모리 -> 메인메모리, 외부로 보내거나, I/O 출력 (Host CPU)
이런식으로 3 단계로 일반적인 Step 이라고 볼수 있다.
Memory Handling
CPU 와 GPU 메모리는 공간이 분리되어있다는 걸 염두할 필요가 있다. 그리고 CPU 와 GPU 에서의 Memory 할당을 보자
예제를 한번 보자. 자세하게 보면, 메모리를 할당할때, 간접적으로, dev_a 와 dev_b 를 받아주는걸 볼수 있다. 그리고, Host 에서 GPU 로 a 라는 걸 SIZE * sizeof(float) 만큼 할당해서, device 에 있는 dev_a 를 가르키게끔 되어있다. 그다음 dev_b 에서 dev_a 를 copy 한 이후에, dev_b 에 있는걸 b 로 Copy 하는 걸 볼 수 있다.
그렇다면, 코드 생성은 컴파일러 입장에서는, 어떤 코드는 CPU 로 가고, 어떤 코드는 GPU 로 가는지를 한 소스코드에서 판단을 해야한다. 즉 어디까지는 끊어서 이거는 내가 어디를 끊어야될지를 구분을 지어야한다. 방법으로틑 파일이 있다. 즉 어떤 파일은 CUDA 로 Compile 하게 끔, 다른 어떤 파일은 MSVC 로 Compile 하게끔 한다. 또 한줄씩 컴파일로 할때도 가능이 가능하다. 하지만 둘다 Bottleneck 이 존재한다. 파일로 할때는, 관리를 해줘야하며, 코드 라인으로 할때는 너무 하기에는 양이 너무 많다.
그래서 그 중간이 Function 이다 (어떠한 Cuda programming model 이라고 보면 좋을것 같다.) 즉 compilation unit 은 function 단위로 하게끔 되고, 각각의 function 들은 GPU 로 할지 CPU 로 할지가 결정된다! 어떻게 이걸 결정을 하느냐? 바로 PREFIX 이다. 즉 아래와 같이 어떤 컴파일러가 이 Function 을 가져갈지를 정한다.
Prefix 의 종류는 아래와같다.
__host__ : can be called by CPU (default, can be omitted) (called by host, excuted on host)
__device__: called from other GPU Functions, cannot be called by the CPU (called by device, executed on device)
__global__: launched by CPU, cannot be called from GPU, must return void (called by host, executed on device)
__host__ and __device__ qualifiers can be combined.
결국에 정리를 하자면, *__global__ defines kernel function
each “__” consists of two underscore character
A kernel function must return void
__device__ and __host__ can be used together, which means compiled twice(!), both cannot have their address taken!!
그리고 Restriction 이 존재한다. CUDA Language = C/C++ language with some restriction: (즉 병렬처리를 위해서 Bottleneck 을 만든 현상)
Can only access GPU Memory (CUDA memory, video memory)
in new versions, can access host memory directly, with performance drawback
No static Variables (No static variable declarations inside the function)
위의 내용을 설치하지 않아도, cuda tool kit 이 설치가 완료 되었다고 한다고 하면, 굳이 할 필요 없다. Visual Studio 만으로도 충분히 사용할 수 있다. 일단 C 에 Program Files 안에 CUDA Toolkit 안에 있는 예제 .exe 파일을 돌려보거나, 설치가 되어있다고 하면, Project 를 생성할때 아래와 같이 사용할수 있다.
그리고, 코드를 보면 cu 라는 확장자를 가지고 있다. 또 아래의 코드처럼 생성 이후에, 실행을 시켜보면. hello, CUDA 가 출력이 된다. 자 여기서, 분명 __global__ void hello(void) 쪽이 바로 CUDA 에서 실행되는 부분이다. 그리고 __global__ 이라는 것은 이 함수가 GPU 에서 실행될 것이라는 것을 의미한다. 그리고 이 함수는 모든 GPU 에서 실행될 것이다. 즉 하나의 설정자이다. CUDA 라는게 C++ 위에 올라가는거기때문에, editor 에서 에러 처럼 보일수 있다.. 이건 c/c++ 이 CUDA Kernel 을 포함시킨다를 의미한다.
그리고 <<>> 이 부분이 1 x 1 즉 1 개 Core 만 사용한다는 뜻이다. (Liunux 에서는 안들어갈수 있다.) 저걸 만약에 «1 , 8» 이라고 하면, 1 x 8 개의 Core 를 동시에 사용한다는 의미이다. 그리고 만약 «8, 2» 라고 한다면, 16 개의 Core 를 동시에 사용한다는 의미이다. 그리고 8 개의 세트를 두번씩 돌린다는 말이다.
OS 에 상관 없이 돌려 보아야하기 때문에, Linux 에서 사용을 해보도록 하자. Linux 에서 사용하려면, cudaDeviceSynchronize() 를 사용해야한다. 이 함수는 모든 thread 가 끝날때까지 기다리는 함수이다. 그래서 이 함수를 사용하면, 모든 thread 가 끝날때까지 기다리기 때문에, 모든 thread 가 끝나고 나서야 다음 코드를 실행할수 있다.
#include<cstdio>__global__voidhello(void){printf("hello, CUDA %d\n",threadIdx.x);}#include<vector>intmain(){hello<<<1,8>>>();#if defined(__linux__)
cudaDeviceSynchronize();#endif
fflush(stdout);return0;}
사실 Interactive Web 을 사용하고 싶었고, 뭔가 항상 가지고 있었던, Front-end 는 별로야. 너무 볼것도 많고, 디자인 할것도 많고, Core Value 가 없어보여.. 이런말만 했었는데, 요즘은 Spatial Computing 이 되게 중요하지 않나? 라고 생각해서 mobile 로 할수 있는게 뭘까? 하니 What is Spatial Computing. 읽어보면,
It’s the purset form of “blending technology into the world
라고 작성이 되어있다. 즉 우리가 사용하는 Computer Hardware 를 사라지게 하며, digital 현상으로 볼수 있는, machine 으로 부터 Output 만 보는 형태! 라고 볼수 있다. Application 으로는 VR/AR/MR 등이 있으며, 아래와 같이 정의한다.
VR: VR places the user in another location entirely. Whether that location is computer-generated or captured by video, it entirely occludes the user’s natural surroundings.
AR: In augmented reality - like Google Glass or the Yelp app’s monocle feature on mobile devices - the visibile natural world is overlaid with a layer of digital content.
MR: In technologies like Magic Leap’s virtual objects are integrated into - and responsive to- the natural world. A virtual ball under your desk, for example, would be blocked from view unless you bent down to look at it. In theory, MR could become VR in a dark room.
일단 개발환경을 앞서서, 어떻게 XR 과 관련된 개발을 찾아보자. 일단 ARKit, RealityKit 같은 경우는 ARKit 은 증강현실 프레임워크 이고, RealityKit 는 3D Rendering Framework 이다. RealityKit 이 ARKit on top (ARSession) 에 실행된다고 보면 된다. RealityKit 은 rendering 할수 있는 engine 이 존재하고, physics 또는 animation 을 담당한다. 언어로는 swift / object-c 가 있다. 물론 Framework (Unity)를 껴서 개발은 가능하다. 더 자세한건 여기 Forum 에서 보면 될것 같다. 그리고 RealityKit 과 Metal Computing Shader 와는 같이 작동하고, API 를 사용해서 렌더링 성능을 향상 시킨다.
그리고 OpenXR 같은 경우 vulkan 을 만든 chronus group 에서 만들어졌고, 뭐 C/C++ 을 사용한다. 그리고 나머지는 WebXR 이다. 웹브라우저에서 XR 을 지원하기 위해서 만들어졌으며, WebGL 함께해서 갭라을 한다고 하자.
물론 Metal 을 공부하는것도 나쁘진 않지만, 기본적인 구조는 DirectX11/12 Graphics Pipeline 는 같은것 같다?(이건 확인 필요!)
Setting up IOS(VM) Dev on Windows or MacOS directly
이 부분은 굉장히 까다로웠다. 일단 기본적으로 환경설정을 고려할때, 굳이 macOS 를 Base 로 쓰고 싶지 않았다. VMWare 설치 및 환경설정 (단 여기서, .iso file 은 unlocker 에 있는 .iso) 파일을 설치하도록 하자. 그리고 Resolution Setting 여기를 확인해보자. 가끔씩 VMWare 가 금쪽이 같은 면 이있지만 App 을 Build 하고 코드 작성하는데 크게 문제가 있지는 않은것 같다. 그리고 XCode 를 혹시 모르니까 설치를 해놓자. 설치하는데 시간을 뻇기는건 어쩔수 없는거긴 하지만, 너무 비효율적이고, 길어진다. 인터넷 같은 경우에는 VMWare Player 세팅에서, NAT: Used to share the host's IP address 만 해놓으면 괜찮다.
그리고 부가적으로, Homebrew 를 설치하자. /bin/bash -c "$(curl -fsSL https://raw.githubusercontent.com/Homebrew/install/HEAD/install.sh)".
그이후에 https://reactnative.dev/docs/set-up-your-environment?os=macos&platform=ios 여기에서 Environment 를 설정해주자.
node - v
nvm - v
npm - v
vim ~/.zprofile # or .zsrc / .bashrc# add this into .zprofile & .zsrc & .bashrcexport NVM_DIR="$HOME/.nvm"[-s"/opt/homebrew/opt/nvm/nvm.sh"]&&\."/opt/homebrew/opt/nvm/nvm.sh"# This loads nvm[-s"/opt/homebrew/opt/nvm/etc/bash_completion.d/nvm"]&&\."/opt/homebrew/opt/nvm/etc/bash_completion.d/nvm"# This loads nvm bash_completionsource ~/.zprofile # .zprofile, .zsrc, .bashrc
nvm install--lts
node - v
nvm - v
npm - v
이후에는 XCode 설치 및 설정을 한다. XCode -> Settings -> Command Line Tool 최신으로 바꿔준다. 그리고 IOS Simulator 를 설치하면 끝이다.
Project Setting
프로젝트 생성 관련 및 개발환경 관련된건 두가지가 있다. Expo 와 React Native CLI 가 있는데, 자세한건 이 링크 간단하게 말하면, Expo 는 개발 환경 초기설정을 단순화하고 개발 속도가 빠르다는 장점이 있다. Expo go 앱이 있다면 프로젝트 실행이 된다. 하지만 제공되는 API 만 사용해야되고 Native Module 이 없기 때문에, 기술 구현상 어려운 부분이 있다. 그리고 Package 볼때, Expo 에 사용될수 있는지 확인 해야 한다.
React Native 같은 경우 Native module 을 사용할수 있고, 다양한 라이브러리 사용 가능하다. 기본적으로 제공되는 라이브러리가 없다 보니, 대부분 기능 구현에 있어서는 직접 설치해야한다 하지만 장점으로는 유지보수가 잘되어있다고 한다. (이건 잘모름) 배포 하기 위해서는 Android Studio 나 XCode 가 있어야한다. 이 글을 보게 되면 어떤걸로 개발할지가 뭔가 잘 나와있다. 결국에는 요약한건 이거다. (React Native itself is an abstraction over the native layer and expo adds another abstraction on top of that one ... learning react native cli first can help you with debugging issues when using expo)
Create Project
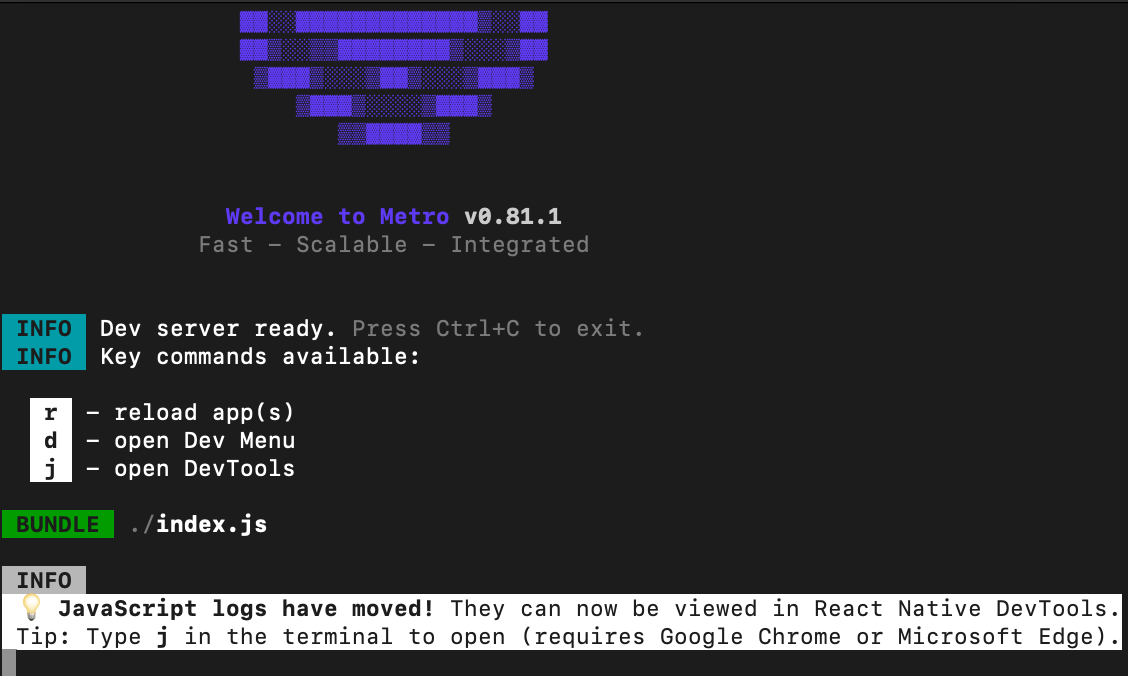
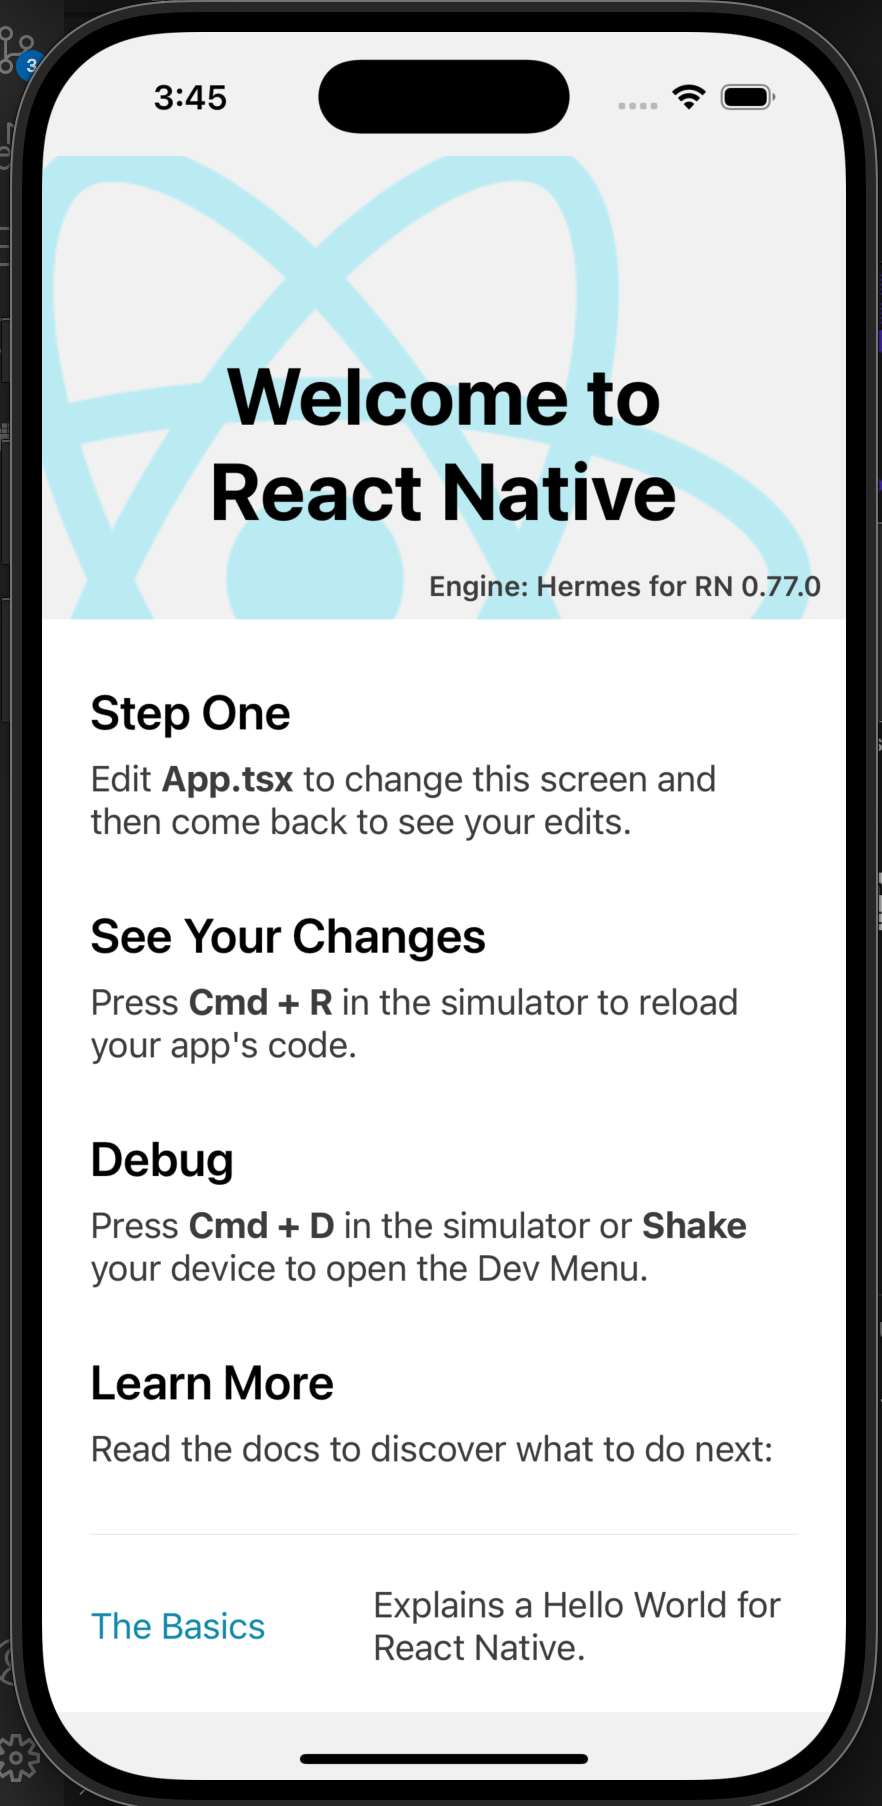
처음 하기에는 expo 로 한다고 했는데, 나는 장기적으로 보기 때문에, cli 로 했다. expo 로 개발하려면 expo 개발환경 설정 참조하자.
기존에 react-native-cli 를 전역(global) 로 설치한적 이 있으면 깔끔하게 지워주자. 그리고 project 를 생성하자.
Combine 을 알기전에 앞서서, Combine 이 나오기전에 어떻게 비동기 event 를 처리했는지 보자. 아래의 코드는 간단한 Fake Jason Data 를 Load 해서 UI 에 뿌리는 용도이다. @escaping 이라는걸 간단하게 이야기하자면, 일단 함수안에 completionHandler 가 매개상수로 들어오고, 이 closure 는 함수가 시작한 이후에 바로 실행시킬수 있게끔 되어있다. 만약 asyncAfter 를 사용하게 되면, 함수는 끝나는데 closure 가 살아있을수가 없기 때문에, @escaping 사용해서 closure 가 비동기로 사용할수 있게끔 만들어주는거다. 이를 통해서 비동기 처리를 통해서 Data 를 받아 올수 있었다.
The Combine framework provides a declarative Swift API for processing values over time. These values can represent many kinds of asynchronous events. Combine declares publishers to expose values that can change over time, and subscribers to receive those values from the publishers.
즉 Publisher 와 Subscriber 가 있고, Publisher 는 Data 를 방출하거나, 뭔가의 완료의 Signal 보내는 역활을 하고, Subscriber 는 Publisher 가 쏴준 Data 나 완료 Signal 을 받는 역활을 한다. 그리고 그 사이에 Operator 가 있는데 Publisher 가 생성하는 이벤트를 처리하는 역활을 한다. 이때 연산자(map, filter, reduce) 를 사용할수 있다.
기본적인 예시는
importCombineletpublisher=[10,20,30,40,50].publisherpublisher.map{$0*2}// Operator 를 통해서 값 변환.sink{print($0)}// 값을 recevied
Publisher 연산자에도 (Just, Sequence, Future, Fail, Empty, Deferred, Record) 등이 있다. Just 를 사용한 Publisher 를 사용해보자.
아래의 코드는 여기에서 "https://jsonplaceholder.typicode.com/todos/1" todo 를 하나 가지고 와서, Data 를 Publisher 를 통해서 가지고 온이후에 subscriber 로 receive 받은 이후, UI 를 main thread 에서 update 를 해주는 코드이다.
그리고 Timer Publisher 의 사용법을 하려고 한다. Timer Thread 의 on 은 어떤 RunLoop 에서 Timer 를 사용할지를 정해줄수 있다. 여기에서는 main thread 를 사용하고, 어떠한 방식으로 RunLoop 을 실행할건지를 넣어주는데 default 값을 넣어주었다. 여기에서 필수적으로 알아야하는건 Timer 가 반환하는 Publisher 는 ConnectablePublisher 이며, 이 Publisher 를 subscribe 해서 실행하려면, connect() 나 autoconnect() 를 사용(첫 subscriber 구독 할때). sink 로 receive 해서 print 를 하면된다. 그리고 main thread 가 기다리면서, 5 초 뒤에 subscribe 취소 해주면된다.
어떤 Language 가 됬든 일단 방대한 Data 를 Loading 을 해야하거나, 어떤 통신에 맞물려서 상태 return 받을 때 main thread 에서 모든걸 하게 되면, Performance 가 떨어진다. Swift 에서는 이걸 어떻게 해결하는지, 동작 방법 및 실제 구현해서 App 에서 어떻게 Profiling 을 하는지도 봐보자.
GCD (Grand Centeral Dispatch)
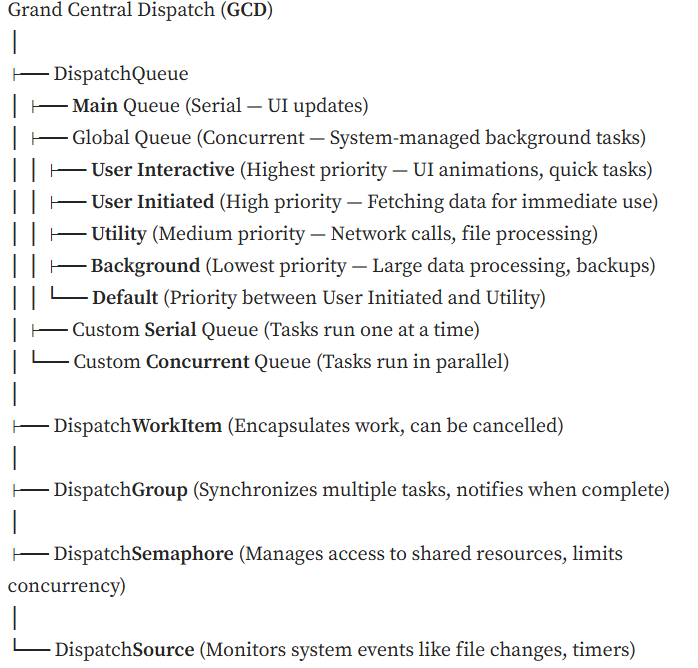
일단 Multithreading 을 알기 이전에 Grand Central Dispatch 에 대한 용어 부터 보자. wiki 에서 나와있는것 처럼 multi-core processor 와 other symmetric multiprocessing system 을 최적화하는걸 support 하기위해서 만들어졌고, Thread Pool Pattern 으로 Task 기반으로 병렬화를 진행한다. Thread Pool Pattern 생소할수 있는데, Thread Pool 은 결국에는 Thread(일용직) 들을 위한 직업 소개소라고 생각하면 된다. 여러개의 Thread 가 대기 하고 있다가 할 일이 들어오면, 대기했던애가 들어와서 일(실행) 하게 되는거라고 볼수 있다. Thread Pool 은 Queue 기반으로 만들면된다. 그래서 Swift 에서는 DispatchQueue 를 사용해서 이를 해결한다. 쉽게 말해서 Task 에 대한 병렬 처리 또는 (비)동기 처리 를 총괄하는 것이 GCD 라고 볼수 있다. 아래의 그림을 보면 간략하게 GCD 가 뭔지를 대충 알 수 있고, DispatchQueue, DispatchWorkItem, DispatchGroup(thread group?) 등을 볼수 있다. (참고: Ref)
GCD 에서 제공 하는 Thread 를 살짝 살표 보자면 Main(Serial) 은 UiKit 이나 SwiftUI 의 모든 요소를 담당한다고 볼수 있고, Global(Concurrent) 같은 경우는 system 전체에서 공유가 되며, 병렬적으로 실행되지만 QoS 따라서 prioirity 를 지정할수 있다.
Priority 위의 그림에서 Interactive 가 Highest Priority 를 가지고, 아래로 갈수록 우선순위가 낮아진다. (참조: Energy Efficiency Guide for iOS Apps) 참조한글을 보면 Use Case 별로 아주 잘 나와있다.
DispatchQueue
Apple Developer Doc 에 찾아보다 보니 DisptchQueue 라는걸 이렇게 설명한다. An ojbect that manages the execution of tasks serially or concurrently on your apps main thread on a background 마치 QT 하고 비슷한 역활을 하는구나라고 볼수 있다. DispatchQueue 는 결국엔 어떤한 work 에 해당되는 item 들이 있다보면, 그 work 의 실행을 Thread Pool 에 넘겨서, executuion 된다고 볼수 있다.
Thread 를 이야기할때는 내가 짠 프로그램이 Thread Safe 한지를 Check 를 해야하는데, 이 DispatchQueue 는 Thread-Safe 한다고 한다. (즉 Thread 들이 한곳에 접근 가능하다는 뜻이다.)
위에 GCD Image 를 보면 Serial 과 Concurrent 로 나눠지는데, Serial 순차적으로 Task 진행 (전에 있던 Task 가 끝난 이후), Concurrent 는 작업이 끝날때까지 기다리지 않고, 병렬 형태로 동시에 진행이다. 결국엔 이게 async 와 sync 키워드로 나눠진다.
일단 DispatchQueue 사용법을 봐보자. 일단 print 된걸 보면 제일 마지막에 Main Thread 가 돌아가고, Aync 로 돌리기 때문에 개념상으로는, for-loop 과 다른 background 와 userInteractive 용 thread 가 동시에 돌리는걸 볼수 있다. 그리고 계속 돌리다보면, Output 은 다를것이다. 하지만 확인할수 있는건 userInteractive 가 background 보다는 더 빨리 돈다는걸 확인할 수 있다.
예를 들어서 어떤 Data 를 다운로드 받아서 display 를 한다고 하자. 물론 어떤 Loader 로 부터 다운로드 받아서 fetch 하기는 하는데, 여기에서는 간단하게, 한군데에서 하고, downloadData method 자체를 private 으로 구분해주자. 각 class 역활은 BackgroundThreadViewModel class 는 fetch, download 를 하고 async 로 Data 를 Download 받고 fetch 로 UI 에 다가 download 된 데이터를 뿌려준다라고 보면될것 같다. 일단 .background thread 에서 돌리는거 하나 `main 에서 UI update 해주는걸 생각하면 될것 같다.
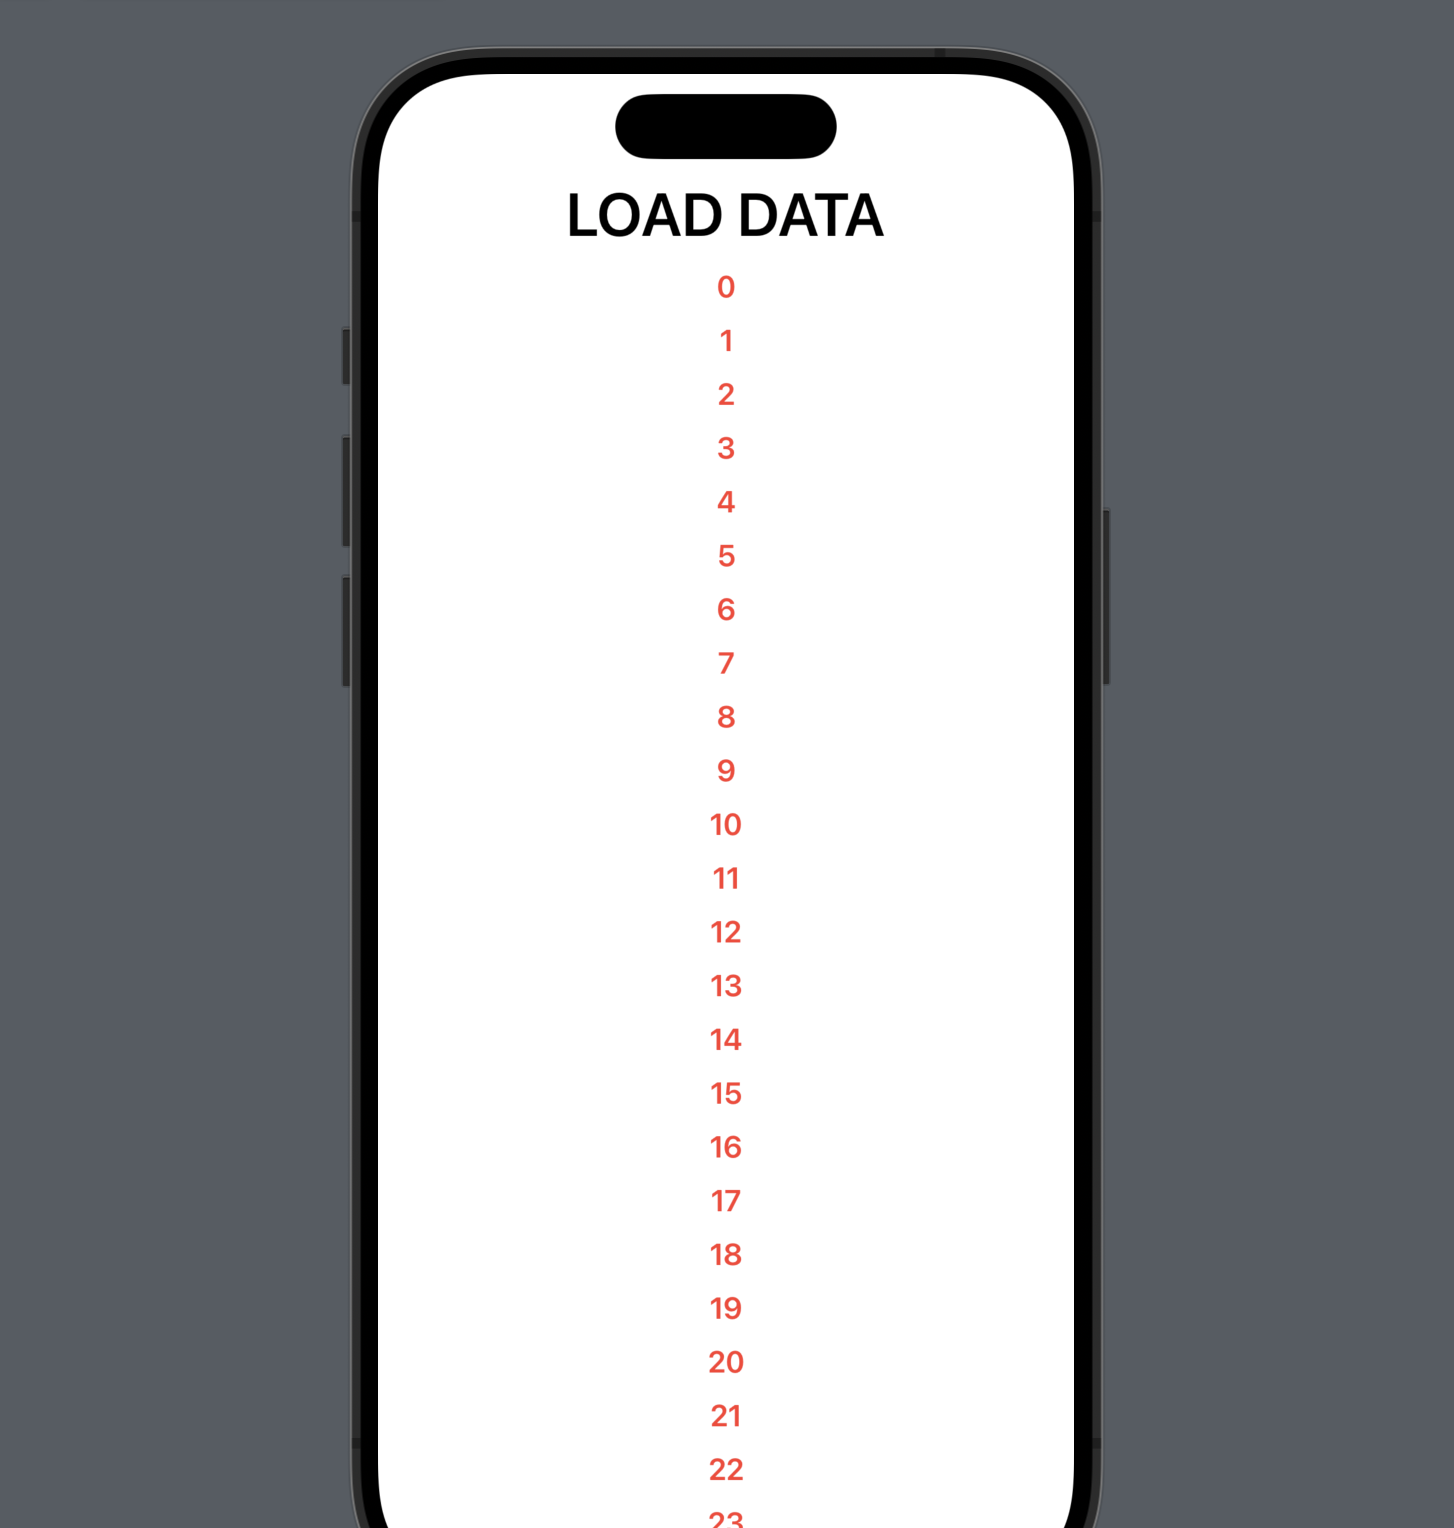
importSwiftUIclassBackgroundThreadViewModel:ObservableObject{@PublishedvardataArray:[String]=[]funcfetchData(){// Background Thread// DispatchQueue.global().asyncsDispatchQueue.global(qos:.background).async{letnewData=self.downloadData()// Main Thread Update (UI)DispatchQueue.main.async{self.dataArray=newData}}}privatefuncdownloadData()->[String]{vardata:[String]=[]forxin0..<50{data.append("\(x)")}returndata}}structBackgroundThreadBootcamp:View{@StateObjectvarvm=BackgroundThreadViewModel()varbody:someView{ScrollView{LazyVStack(spacing:10){Text("LOAD DATA").font(.largeTitle).fontWeight(.semibold).onTapGesture{vm.fetchData()}ForEach(vm.dataArray,id:\.self){iteminText(item).font(.headline).foregroundColor(.red)}}}}}#Preview {BackgroundThreadBootcamp()}
자.. 여기에서 할수 체크할수 있는건 build 를 해보고 돌려보는거다. 아래의 그림을 보면 Main Thread 1 에서 첫 Loading 과 그리고 뿌려질때의 spike 가 보이는걸로 보이고, thread 3 에서 이제 downloading 하는걸 볼수 있다. 그 이외에 background thread 도 아마 관찰이 가능할거다. 여기에서 중요한점은 무조건 thread 를 많이 사용하면 좋지 않다라는 점과 developement doc 에서도 sync 로 했을경우에 deadlock 현상이 나타날수 있다는거만 주의하면 과부하가 잃어나지 않는 앱을 만들수 있을것이다.
실제 Image Loader 를 만들어본다고 하자. 총 3 가지의 방법이 있다고 한다. escaping, async, combine 형태로 아래의 코드를 봐보자. 배경설명은 이러하다. URL 로 부터, 서버에서 Image 를 가져와서 화면에 뿌려주는 그런 앱을 작성한다고 하자. 일단 URL 과 UImage 를 받았을때의 Handler 를 작성한걸 볼수 있다. Data 를 못받으면 nil 로 return 을 하고, 아니면 Data 를 받아서 UIImage 로 변경해주는 코드이고, response error handling 도 안에 있다.
일단 기본적으로 escape 를 사용한걸 보면, URLSession.shared.dataTask 자체가 closure 형태로 전달로 받고, .resume() method 를 반드시 작성해줘야하며, 하나의 background thread 로 동작한다. 그리고 completionHandler 를 통해서 image 를 받을시에 UIImage 와 함께 error 코드를 넘겨준다. (void return). 그 이후 image 를 fetch 한 이후에 main thread 를 update 해야 UI 에서 보여지기 시작한다.
이것만 봤을때는 코드가 잘작동은 되겠지만, 별로 깔끔하지못하다. 그 아래 코드는 combine 이다. 위의 Escaping 코드를 본다고 하면, combine 도 not so bad 이다. 정확한건 combine 이라는 개념만 이해하면 잘작성할수 있을것 같다.
마지막으로는 async 를 사용한 데이터 처리이다. URLSession.shared.data(from: url, delegate: nil) 여기 함수 signature 을 보면 data(from: URL) async throw -> (Data, URLResponse Description ...to load data using a URL, creates and resume a URLSessionDataTask internally... 라고 나와있다. 즉 이 함수를 호출하게 되면 바로, URLSession.shared.data(from: url, delegate: nil) 호출하고 tuple() return 을 받지만, response 가 바로 안올수도 있기 때문에 await 이라는 keyword 가 필요하다. 그래서 await 을 사용하게 되면, 결국엔 response 가 올때까지 기다리겠다라는 뜻이다. 그 이후에 downloadWithAync() 를 호출할때, concurrency 를 만족하기위해서 여기에서도 async keyword 가 필요하다. 그렇다면 마지막으로 main thread 에서 어떻게 UI Update 를 할까? 라고 물어본다면, 답변으로 올수 있는 방법은 DispatchQueue.main.async { self?.image = image } 하지만 아니다. main thread 에서 이걸 처리를 하려면, .appear 부분에서 Task 로 받아서 await 으로 처리해주면 된다. 빌드 이후에 Warning 이 뜰수도 있는데 이부분은 Actor 라는걸로 처리를 하면된다. 물론 Actor 라는건 이 post 에서 벗어난 내용이지만 따로 정리를 해보려고 한다.
importSwiftUIimportCombineclassDownloadImagesAsyncImageLoader{leturl=URL(string:"https://picsum.photos/200")!funchandleResponse(data:Data?,res:URLResponse?)->UIImage?{guardletdata=data,letimage=UIImage(data:data),letres=resas?HTTPURLResponse,// res coderes.statusCode>=200&&res.statusCode<300else{returnnil}returnimage}// escapingfuncdownloadWithEscaping(completionHandler:@escaping(_image:UIImage?,_error:Error?)->()){// async codeURLSession.shared.dataTask(with:url){[weakself]data,res,errinletimage=self?.handleResponse(data:data,res:res)completionHandler(image,err)return}.resume()}// CombinefuncdownloadWidthCombine()->AnyPublisher<UIImage?,Error>{URLSession.shared.dataTaskPublisher(for:url).map(handleResponse).mapError({$0}).eraseToAnyPublisher()}// AsyncfuncdownloadWithAync()asyncthrows->UIImage?{do{let(data,res)=tryawaitURLSession.shared.data(from:url,delegate:nil)returnhandleResponse(data:data,res:res)}catch{throwerror}}}classDownloadImagesAsyncViewModel:ObservableObject{@Publishedvarimage:UIImage?=nilletloader=DownloadImagesAsyncImageLoader()varcancellables=Set<AnyCancellable>()funcfetchImage()async{// escapeloader.downloadWithEscaping{[weakself]image,errorinDispatchQueue.main.async{self?.image=image}}// combineloader.downloadWidthCombine().receive(on:DispatchQueue.main).sink{_in}receiveValue:{[weakself]imageinself?.image=image}.store(in:&cancellables)// async letimage=try?awaitloader.downloadWithAync()// Error -> run this main thread// To resolve this issue: key concept for actorawaitMainActor.run{self.image=image}}}structDownloadImagesAsync:View{@StateObjectprivatevarvm=DownloadImagesAsyncViewModel()varbody:someView{ZStack{ifletimage=vm.image{Image(uiImage:image).resizable().scaledToFit().frame(width:250,height:250)}}.onAppear(){Task{// get into async taskawaitvm.fetchImage()}}}}#Preview {DownloadImagesAsync()}
Generic
사실 cpp 에서는 Meta programming 이라고도 한다. swift 에서도 generic 을 일단 지원한다. 어떤 타입에 의존하지 않고, 범용적인 코드를 작성하기 위해서 사용된다.
이런건 코드로 보면 빠르다.
funcswapValues<T>(_a:inoutT,_b:inoutT){lettemp=aa=bb=temp}vara=10varb=20swapValues(&a,&b)print(a,b)structStack<T>{// Generic Type(T) Arrayprivatevarelements:[T]=[]mutatingfuncpush(_value:T){elements.append(value)}// std::optional T (null) | swift (nil)mutatingfuncpop()->T?{// exceptionguard!elements.isEmptyelse{returnnil}returnelements.popLast()}vartop:T?{returnelements.last}funcprintStack(){ifelements.isEmpty{print("Stack is Empty")}else{print("Stack: \(elements)")}}}varintStack=Stack<Int>()intStack.push(1)intStack.push(2)ifletitem=intStack.pop(){print("Pooped Item : \(item)")}
C++ 에 있는 Function Type 을 이해하면 편하다. Swift 에서도 Function Type 이 존재한다. 아래의 코드를 보면 Function Type Declaration 이 존재한다. (Int, Int) -> Int 하고 addTwoInts 라는 함수를 참조한다. (여기에서 참조). 즉 swift 가 할당을 허락한다. 라는 뜻. 저 불편한 var 로 할당된걸, 함수로 표현하게 되면, (Int, Int) -> Int 자체를 함수의 Parameter 로 넘겨줄수도 있다.
// Function Type ExamplefuncaddTwoInts(_a:Int,_b:Int)->Int{returna+b}funcmultiplyTwoInts(_a:Int,_b:Int)->Int{returna*b;}funcprintHelloWorld(){print("hello, world")}varmathFunction:(Int,Int)->Int=addTwoIntsprint("Result : \(mathFunction(2,3))")funcprintMathResult(_mathFunction:(Int,Int)->Int,_a:Int,_b:Int){print("Result: \(mathFunction(a,b))")}
그리고 다른 함수의 반환 타입으로 함수 타입을 설정할수 있다. 반환하는 함수의 반환 화살표를 -> 사용해서 함수타입으로 사용할수 있다.
// Function Type ExamplefuncstepForward(_input:Int)->Int{returninput+1}funcstepBackward(_input:Int)->Int{returninput-1}funcchooseStepFunction(backward:Bool)->(Int)->Int{returnbackward?stepBackward:stepForward}varcurrentValue=3letmoveNearerToZero=chooseStepFunction(backward:currentValue>0)
여기서 (Int) 라는 chooseStepFunction 안에 있는 함수의 Return 을 의미하고, Parameter 는 Boolean 값으로 넘겨주며, return 을 그 다음 화살표인 Int 로 한다는 뜻 이다.
아직 코드가 간결하지 않다, Nested 함수로 해보자. 함수안에 함수를 작성하는게 불필요할수도 있지만, Closure 을 이해하기전에 필요한 정보이다. 아래의 코드를 보면, currentValue > 0 이면 False 를 반환하고, chooseStepFunction(backward) 가 stepForward 함수를 반환한 이후, 반환된 함수의 참조값이 moveNearerToZero 에 저장된다.
C++ 에서 Closure 라고 하면, 주로 Lambda Expression (Lambda) 를 Instance 화 시켰다고 볼수있다. 즉 위에서 본것 처럼, swift 에서도 똑같은 의미를 가지고 있다. 자 중첩함수에서 본것 처럼 chooseStepFunction 이라는 함수 이름이 존재했다. 그리고 값을 (=) 캡쳐해서 currentValue 를 Update 하였다. closure 는 결국 값을 캡처할수 있지만, 이름이 없는게 Closure 의 개념이다.
Closure 의 Expression 은 아래와 같다. (<#parameters#>) -> <#return type#> Closure 의 Head 이며, <#statements#> 는 Closure 의 Body 이다. Parameter 와 Return Type 둘다 없을수도 있다.
주의점이 하나 있는데, 예를들어서 아래의 코드를 본다고 하자. 첫번째 print 를 했을때는 "Hello, Nick" 이라는게 나온다. 하지만 두번째 Print 에서는 error: extraneous argument label 'name:' in call print(closure(name: "Jack")) 라는 Error 가 뜬다. Closure 에서는 argument label 이 없다. 이 점에 주의하자. 일반 함수 Call 과 다르다. 여기에서 또 봐야할점은 Closure Expression 을 상수에 담았다.(***)
그리고 Function Type 을 이해했다라고 한다면, Function Return Type 으로 Closure 을 return 할수 있으며, 함수의 Parameter Type 으로도 Closure 가 전달이 가능하다. 여기서 첫번째로는 아까 그냥 함수를 작성할때와는 다르게 Argument Label 이 없어야한다고 하지 않았나? 근데 실제 Arugment Label 이 없으면 missing arugment label 'closure' 이라는 Error 를 내뱉는다. 즉 에는 Argument Label 이 Parameter 로 전달됬다는걸 볼수 있다. 그리고 return 같은 경우는 위의 Function Type 을 이해했다면 충분히 이해할수 있는 내용이다.
// function Type: Closure as ParameterfuncdoSomething(closure:()->()){closure()}doSomething(closure:{()->()inprint("Hello!")})// function Type: Closure as ReturnfuncdoSomething()->()->(){return{()->()inprint("Hello Nick!")}}varclosure=doSomething()closure()
클로져의 용도는 간단하면서 복잡한데, 주로 Multithreading 에서 안전하게 State 관리를 하기 쉽다. 하지만 관리 하기 쉽다는건 항상 뭔가의 Performance 가 조금 Expensive 하다는 점이다. 조금 더 자세한걸 알면 Functor 를 보면 될것 같다.
일단 Swift 안에서는, Array, Queue, Stack 이 Data Structure 이 있다. 뭔가 c++ 처럼 Library 를 지원 queue 나 stack 을 지원하나 싶었는데? 없다고 한다 ref 그래서 직접 구현하란다. 하지만 Deque<Element>, OrderedSet<Element>, OrderedDictionary<key, value>, Heap 은 Collection Package 에 있다고 한다. 흠 왜? Array 하고 Sets 는 주면서? 조금 찾아 보니, Array, Set 의 최소한의 자료구조만 표준으로 제공하고, 다른건 Pacakaging 해서 쓰란다. 그리고 생각보다 Generic 도 잘되어있지만, 역시 CPP 하고 비교했을때는 불편한점이 있긴한것같다.
Array & Sets
둘다 Randomly Accessible 하다. 이 말은 Array 같은 경우, 순차적으로 메모리에 저장되므로, 어떤 특정 Index 에서 접근 가능. Set 같은 경우, Hash Table 기반으로 구현되어 있어서 var mySet: Set = [10, 20, 30].contain() 라는 함수로 있으면 True 없으면 False return 을 한다.
왜? 삽입/삭제시 성능 저하? => 찾아서 지워야할텐데, Element 가 마지막이면 O(n) 이니까, 그래서 Set 사용하면 되겠네
Set 과 Array 의 차이점: Set 은 unordered array 는 ordered.
예제 코드들 보니까, Generic 도 사용할수 있다. 그리고 Swift 에서 특별하다고 생각했던게, 요청하지 않는 한 value type 인 애들의 속성값 변경을 허용하지 않는다는거, 즉 Instance method 에서 수정할수 없다는거, 특이하구나…
Queue
FIFO (First In, First Out) 구조 (ex: printer & BFS)
Example Code
structQueue<T>{// Generic Type(T) Arrayprivatevarelements:[T]=[]mutatingfuncenqueue(_value:T){elements.append(value)}// std::optional T (null) | swift (nil)mutatingfuncdequeue()->T?{// exceptionguard!elements.isEmptyelse{returnnil}returnelements.removeFirst()}varhead:T?{returnelements.first}vartail:T?{returnelements.last}funcprintQueue(){ifelements.isEmpty{print("Queue is Empty")}else{print("Current Queue: \(elements)")}}}varqueue=Queue<String>()queue.enqueue("Nick")queue.enqueue("Kayle")queue.enqueue("Juan")queue.printQueue()ifletserving=queue.dequeue(){print(serving)// Optional("Nick")}ifletnextToServe=queue.head{//Optional("Kayle")print(nextToServe)}queue.printQueue()
Stack
LIFO (Last In, Last Out) 구조 (call stack)
Example Code
structStack<T>{// Generic Type(T) Arrayprivatevarelements:[T]=[]mutatingfuncpush(_value:T){elements.append(value)}// std::optional T (null) | swift (nil)mutatingfuncpop()->T?{// exceptionguard!elements.isEmptyelse{returnnil}returnelements.popLast()}vartop:T?{returnelements.last}funcprintStack(){ifelements.isEmpty{print("Stack is Empty")}else{print("Stack: \(elements)")}}}varcookieJar=Stack<String>()cookieJar.push("chocolate")cookieJar.push("walnut")cookieJar.push("oreo")cookieJar.printStack()ifletpopItem=cookieJar.pop(){print(popItem)}cookieJar.printStack()iflettopItem=cookieJar.top{print(topItem)}
Memory Management in Swift
IPhone 이라는 어떤한 Device 를 놓고 봤을때, Storing Data 의 방법은 두가지 있을것 같다.
Disk
RAM
만약 App 을 실행시킨다고 했을때, executable instructions 이 RAM 에 올라가고, system OS 에서 RAM 의 덩어리 일부분(Heap)을 Claim 하면서, App 을 실행시킨다. 그래서 앱에서 실행시키는 모든 Instance 들이 Life cycle 을 가지게 된다. C/CPP 에서도 마찬자기로 malloc / new / delete heap 영역에서의 memory management 를 프로그래머가 해주니까 뭐 말이된다.
Swfit 에서는 Memory Management 는 ARC 에서 해준다.결국에는 모든 Instance 들이 reference count 라는걸 가지고있고, 그 reference count 는 properties, constants, and variable 들에 strong reference 로 잡혀져 있다. 그래서 ref count 가 0 일이 될때 메모리 해제된다! 완전 Smart Pointer 잖아! 또 궁금한게, Garbage Collection 이라는 Keyword 도 무시할수 없는건데, 이것도 전부다 ARC 에서 한다고 한다 그리고 Ownership 도 생각해봐야할 문제 인것 같다.
Reference -> Coupling -> Dependency
Reference 를 생각하고 개발하다보면, 결국에 오는건 Coupling / Dependency / Circular Dependency 문제이다. 그래서 C++ 에서는 Interface 사용하거나, weak_ptr 사용해서, Strong Count 를 안하게 하는 방법이 있다.
swift 에서는 Weak Reference 나 Unowned Reference 를 사용한다고 한다. 바로 예제코드를 보자.
classPerson{varname:Stringvarpet:Pet?// optional init(name:String){self.name=name}deinit{print("\(name) is destructed")}}classPet{varname:Stringvarowner:Person?// optional init(name:String){self.name=name}deinit{print("\(name) is destructed")}}varperson:Person?=Person(name:"Nick")varpet:Pet?=Pet(name:"Jack")// Circular Dependencyperson?.pet=petpet?.owner=personperson=nilpet=nil
와 근데 아무런 Error 안나오는게 사실이냐…? 아니면 Online Compiler 라서 그런가보다 하고 넘기긴했는데.. 좋지는 않네. 뭐 근데 정확한건, deinit() 호출 안되니까 해제가 안됬음을 확인할수 있다.
해결하려면, weak 키워드 사용하면 된다. 아래의 코드를 보자.
classPet{weakvarowner:Person?}
이걸로 변경하면, 서로의 deinit() 호출되면서 Nick 먼저 해제, 그 다음 Pet 해제 형식으로 된다.
다른 하나방법은 unowned 키워드 사용하면 된다.
classPet{unownedvarowner:Person}
Difference Between Unowned and weak
weak 는 Optional 이고, Optional 일 경우에는 Unwrapped 을 해줘야한다.(이말은 Optional 값이 nil 이 아닐 경우에 Safe 하게 unwrap 해줘야하는거) 참조된 객체가 해제되면 nil 로 설정된다. 즉 객체가 해제 되어야하는 상황에 쓸것이다.
unowned 는 Optional 이 아니다. 그리고 참조된 객체가 해제되면 RunTime Error 가 발생한다. (즉 이말은 unowned reference 는 항상 Value 를 갖기를 원한다. = 이거 좋음), weak 와 다르게 unowned unwrap 할필요가없다. 항상 Value 를 가지고 있기 때문이다.
classPerson{varname:Stringinit(name:String){self.name=name}deinit{print("\(name) is destructed")}}classPet1{varname:Stringweakvarowner:Person?// weak 참조는 옵셔널 타입init(name:String,owner:Person?){self.name=nameself.owner=owner}deinit{print("\(name) is destructed")}}classPet2{varname:Stringunownedvarowner:Personinit(name:String,owner:Person){self.name=nameself.owner=owner}deinit{print("\(name) is destructed")}}varperson:Person?=Person(name:"Nick")varpet1:Pet1?=Pet1(name:"weak dog",owner:person!)varpet2:Pet2?=Pet2(name:"unowned dog",owner:person!)// safe unwrapifletowner=pet1?.owner{print(owner.name)}print(pet2!.owner.name)person=nilpet1=nilpet2=nil
Virtual Memory 와 비슷, Paging 을 거쳐서, 주소값 조사 및 저장할곳을 정함, 그리고 메모리 할당해제 했을때, Memory Management Unit 업데이트를 해줘야함.
크기 자체는 Run Time 에 결정
inheritable
Final Keyword 사용 가능
Overall
위와 같은 특징으로 인해서? Class 가 느릴수도 있지만, 관리 측면에서는 역시 Class 가 좋고, 그리고 Struct User Data Type 으로 사용하면 될것 같다.
Intro to protocol
Swift 공식 홈페이지에서의 프로토콜의 정의는 아래와 같다. A protocol defines a blueprint of methods, properties, and other requirements that suit a particular task or piece of functionality. The protocol can then be adopted by a class, structure, or enumeration to provide an actual implementation of those requirements. Any type that satisfies the requirements of a protocol is said to conform to that protocol.
즉 결국엔 Protocol 이라는건 Enum, Struct, Class 의 어떤 Blueprint 에 해당되며, 이 Protocol 을 사용하기위해서는 어떠한 어떠한것들이 필요하다는걸 정의하는 것이다. 즉 요구사항 정리서 (Descriptor) 라고 볼수 있다. 그리고 구현은 Struct 나 Class 에서 직접하면 된다.
Example
Struct Example
CPP 와 비슷 하게 Operator 작성하면 됨
일반적으로 Swift 에서는 Equatable Protocol 을 작성해야 Instance 들의 비교가 가능
protocolGreetable{funcgreet()->String}structPerson{// define propertyvarname:Stringvarage:Intfuncgreet()->String{return"Hello, my name is \(name). Nice to meet you!"}}classRobot{varid:Intinit(id:Int){self.id=id}funcgreet()->String{return"Hello, my special id \(id). Nice to meet You!"}}letperson=Person(name:"Alice",age:32)print(person.greet())letrobot=Robot(id:4)print(robot.greet())
Protocols Extension Example
약간 Overloading 이랑 비슷한것 같기는한데, 일단 Protocol 에서 정의를 했었을때, 똑같은 Protocol 을, 다른 Objects 들이 중복적으로 사용하지 않으려면 사용.
구현된게 우선권을 얻으므로, Person 과 Robot 은 greet() 정의한대로 return, Alien 은 구현체가 없고 Extension 된 Protocol 로 채택
protocolGreetable{funcgreet()->String}extensionGreetable{funcgreet()->String{return"Hello"}}structPerson:Greetable{// define propertyvarname:Stringvarage:Intfuncgreet()->String{return"Hello, my name is \(name). Nice to meet you!"}}structAlien:Greetable{}classRobot:Greetable{varid:Intinit(id:Int){self.id=id}funcgreet()->String{return"Hello, my special id \(id). Nice to meet You!"}}letperson=Person(name:"Alice",age:32)print(person.greet())letrobot=Robot(id:4)print(robot.greet())letalien=Alien()print(alien.greet())
When I was a graduate student, I worked on a project related to Addition, Subtraction, Division, and Multiplication operations. The focus was on how to perform each operation more efficiently, primarily from a hardware perspective (including topics like adding multiplexers).
Let’s first examine example code for Addition, Subtraction, and Multiplication. These are implemented in C++, with the assumption that the first digit is always larger than the second digit. The key characteristic is that all operations are handled as strings.
I have performance metrics for this code based on N. Considering the time complexity, it’s approximately T(N) ≈ N. Of course, when an insert occurs, there might be a constant factor multiplied.
This case might be a bit different. Since there are two loops, we can express the complexity as (N-1) * (N-1) = N². In the process of finding the index of ‘0’, it can be expressed as constant * N². Of course, we might not always discuss the constant factor, but the main point here is to identify what has a major impact.
Karatsuba Algorithm
The Karatsuba algorithm is an efficient multiplication algorithm that uses a divide-and-conquer approach to multiply large numbers. Developed by Anatoly Karatsuba in 1960, it reduces the complexity from O(n²) in the standard multiplication algorithm to approximately O(n^(log₂3)) ≈ O(n^1.585).
Let’s analyze the implementation:
stringKaratsubaHelper(stringstr1,stringstr2,intlevel)// level은 디버깅용{cout<<"Level "<<level<<" : "<<str1<<" x "<<str2<<endl;intN=max(str1.size(),str2.size());str1.insert(0,string(N-str1.size(),'0'));str2.insert(0,string(N-str2.size(),'0'));if(N==1){stringresult=to_string(stoi(str1)*stoi(str2));returnresult;}intmid=N/2;stringa=str1.substr(0,mid);stringb=str1.substr(mid,N-mid);stringc=str2.substr(0,mid);stringd=str2.substr(mid,N-mid);stringac=KaratsubaHelper(a,c,level+1);ac.append(string((N-mid)*2,'0'));returnstring("0");}stringKaratsuba(stringstr1,stringstr2){if(!str1.size()||!str2.size())return"0";stringresult=KaratsubaHelper(str1,str2,0);inti=0;while(result[i]=='0')i+=1;result=result.substr(i,result.size()-i);returnresult;}
Key Insights
The implementation above is incomplete but demonstrates the core concept of the Karatsuba algorithm. Here’s how it works:
Padding: First, we ensure both numbers have the same number of digits by padding with leading zeros.
Base Case: If we’re down to single-digit numbers, we perform a direct multiplication.
Divide: For larger numbers, we split each number into two parts:
If we represent the numbers as X = a·10^(n/2) + b and Y = c·10^(n/2) + d Where a, b, c, and d are n/2-digit numbers
Recursive Multiplication: The complete algorithm would compute:
ac = a × c
bd = b × d
(a+b)(c+d) = ac + ad + bc + bd
ad + bc = (a+b)(c+d) - ac - bd
Combine: The result is ac·10^n + (ad+bc)·10^(n/2) + bd
The current implementation only calculates ac and appends the appropriate number of zeros, but is missing the calculations for bd and (ad+bc).
Optimizations
The key insight of Karatsuba is that we can compute the product of two n-digit numbers with only three recursive multiplications instead of four:
ac
bd
(a+b)(c+d)
From these, we derive ad+bc = (a+b)(c+d) - ac - bd, reducing the number of recursive calls and improving efficiency.
Time Complexity
The time complexity is O(n^(log₂3)) ≈ O(n^1.585), which is significantly better than the O(n²) complexity of the standard multiplication algorithm for large numbers.
To complete this implementation, we would need to:
Calculate bd = b × d
Calculate (a+b)(c+d)
Derive ad+bc
Combine all terms with appropriate powers of 10
This algorithm is particularly useful for multiplying very large integers that exceed the capacity of built-in numeric types.
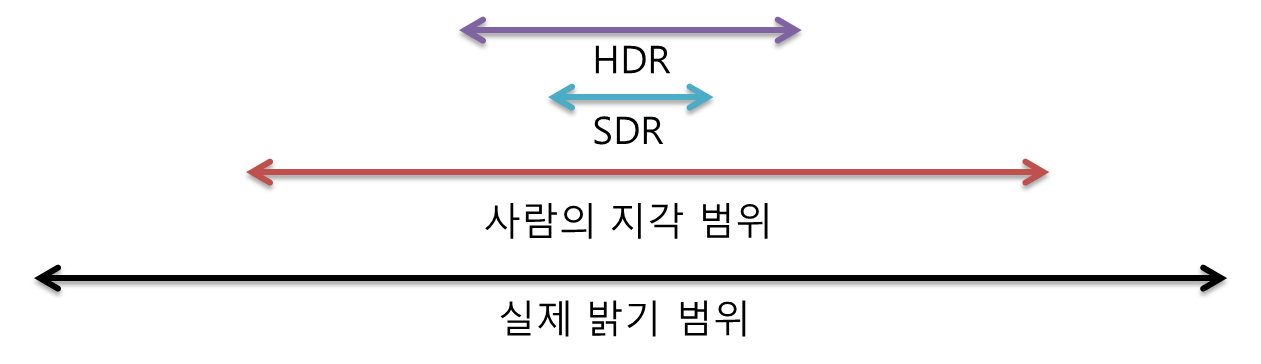
일단 Imaging 이라는 의미에서 보면, High Dynamic Range 라는 말이 빛의 강도(level) 에 따라서, Scene 이 얼마나 변경되느냐? 라는 말이다. Wiki 에서도 “The dynamic range refers to the range of luminosity between the brightest area and the darkest area of that scene or image” 라고 한다.
실제 세상의 광도(Luminance) 범위는 넓다. 하지만 Digital Image 로서는 (JPEG, PNG, LDR) 같은 경우는 RGB 각 채널당 8 Bit 이고, 256 단계를 거치면서, 0 ~ 1 사이의 상대적인 밝기 값만 표현한다. 하지만 현실의 밝기는 그것보다 더넓으며, 표현하는데있어서 한계가 있기 때문에 HDR Imaging 이 나왔다.
그래서 비교를 하자면
특징
LDR(SDR)
HDR
비트 깊이
8-bit per channel (24-bit RGB)
16-bit float / 32-bit float per channel
표현 범위
0 ~ 1 (상대 밝기)
0 ~ 수천 (절대/상대 광도)
Format 예시
PNG, JPEG
OpenEXR, HDR (.hdr), FP16 textures
이러한식으로 표현이 된다. 그래서 Graphics 에서는 어떻게 사용되고, Environment Mapping 할때 어떻게 설정이 되는지를 알아보는게 오늘 이 Post 의 목표이다.
그리고 아래의 그림이 조금더 자세하게 나타내준다.
기존 Enviornment Mapping 을 했을시에는 LDR 이나 SDR 에서 하나 Pixel 에 대한 색깔을 표현할때에, R8G8B8A8_UNORM 기본 적으로 32 bits(8 x 4) 를 사용했고, 0 - 255 까지의 unsigned integer 의 값을 사용했으며, 그 범위를 Normalize 해서 사용했었다. 그리고 기존에 문제라고 하면 문제가, 환경의 Light 들이 많아서, Pixel Shader 에서 값을 처리 Color 값을 Return 할때 1 보다 큰값들을 처리를 못했었다. 즉 내부적으로는 output.pixelColor = saturate(…, 0.0, 1.0) 이런식으로 처리가 된다고 보면 됬었다.
하지만 HDR (High Dynamic Range Rendering): HDRR 또는 High Dynamic Range Lighting 은 HDR 에서 Lighting 을 계산하는것이며, 더 넓은 범위에 대한 조명에 대해서 Rendering 을 할수 있다는 말… 넓은 범위라는건, 사용하는 숫자의 대한 범위가 넓고, DXGI_FORMAT_R16G16B16_FLOAT 이 포맷을 사용한다.
그래서 CPU 쪽에서 SwapChaing 을 생성할때, BufferDesc Format 옵션을 아래와 같이 설정을 해줘야한다.
DXGI_SWAP_CHAIN_DESCsd;ZeroMemory(&sd,sizeof(sd));sd.BufferDesc.Width=m_screenWidth;// set the back buffer widthsd.BufferDesc.Height=m_screenHeight;// set the back buffer heightsd.BufferDesc.Format=DXGI_FORMAT_R16G16B16A16_FLOAT;// floatssd.BufferCount=2;// Double-bufferingsd.BufferDesc.RefreshRate.Numerator=60;sd.BufferDesc.RefreshRate.Denominator=1;
이말은 BackBuffer 를 사용해서, Postprocessing 하는 Buffer Format 들은 전부다 Format 을 변경해줘야한다. (context->ResolveSubresource 하는곳)
HDRI Image Copy (참고)
float 은 기본적으로 32 bits wide 인데, 최근 들어서는 16 bit 로도 충분하기 때문에 Half precision floating point 도 있다. GPU 는 최종적으로 half precision floating point 에 최적화가 잘되어있다고 한다. 그래서 대부분은 아래와 같은 방식으로 f16 library 를 사용하면 된다
Tone Mapping 은 Color Mapping 의 한 종류의 Technique 이라고 한다. 일단 Tone Mapping 을 하는 이유가 있다. 사실 HDRI 의 이미지는 요즘 HDR Camera 에서도 충분히 나온다. 하지만 우리가 사용하는 모니터 / 디스플레이 같은 경우 (0~1 또는 0 ~255(8bits)) 로 제한된 밝기를 표현한다. 아까 이야기 한것처럼 우리가 보는 세계는 넓은 밝기 정보를 가지고 있는데, 이걸 디스플레이에다가 다시 뿌리게 하려면, SDR(Standard Dynamic Range) 로 변환을 해줘야하는데, 현실세계의 밝기 정보를 디스플레이가 표현할수 있는 범위로 압축을 하면서도, 보기 좋은 Image 로 보정/변환 하는 작업을 Tone Mapping 이라고 한다.
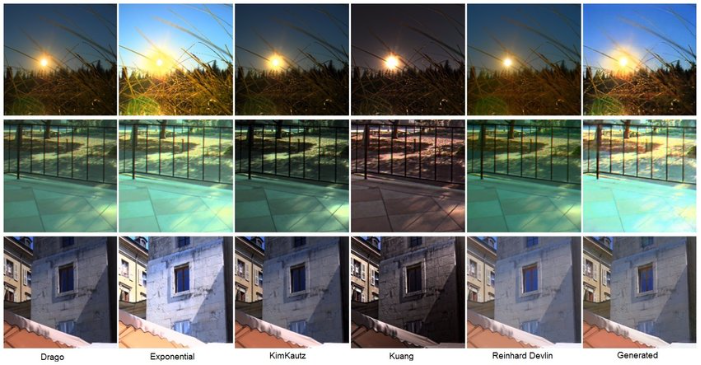
Tone Mapping 이 안됬을 경우에는 어떤 Side Effect 가 있을까? 라고 물어본다면, 아래와 같이, 밝은 영역이 모두 하얗게 뭉게지거나, 너무 어두운영역도 뭉개지게 된다. 즉 숨어있는 이 Pixel 값을 잘 보정시켜서 조금 더 부드러운 Image 를 만들고, 그리고 이걸 잘? Rendering 하는게 관점이다.
Tone Mapping 도 아래와같이 여러개의 Operator 들이 있다.
Exposure
Exposure: 카메라의 어떤 현상, 렌즈를 오래 열어 놓으면, 빛을 더 많이 받아들이는 현상이다. 예를 들어서 예제 JPG 이미지 같은 경우 (즉 SDR) 일때는 Exposure 를 키우게 되면, 그냥 화면 자체가 밝아진다. 하지만 HDRI 같은 경우, 전체 Pixel 이 선명?해지는것과 밝아지는거의 차이가 있다. 그래서 Exposure 을 낮춘다고 했을때
아래의 그림처럼 진짜 태양 찾기가 가능해진다.
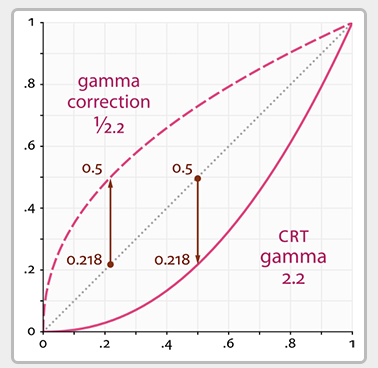
Gamma Correction
Gamma Correction : 어떤 영역에 색을 더 넓게 보여줄지를 의미한다. 옛날 모니터 같은 경우는 cathode-ray tube monitor 라고 하고, Input Voltage 를 두배로 컴퓨터에 줬을때, 2배로 Output 이 전혀 나오지 않았다. 즉 선형보다는 비선형으로 Gamma 지수에 따라서 비선형적으로 출력을 했고, 입력신호의 2.2 제곱에 해당하는 밝기를 출력 했다.
그래서 즉 모니터의 Gamma 가 2.2 라고 한다고 하면, Image 를 Display 하기전에 Pixel 값을 Input^1/2.2 저장하거나 변환을 해줘서 Linear Tonemapping 을 만들수 있다. 그리고 이 Gamma 값을 조정할수 있는게 Gamma Correction 이라고 말을 할수 있겠다.
HDRI Pipeline
결국 PBR 에 가까워지려면, 환경맵이 필요하고, 그 환경맵을 HDRI (High Dynamic Range Image) 를 이용할 수 있다.